I’m sure we would all agree that one of the most pleasing and traditional images of Christmas is the candy cane. Whether stuffed in stockings or hanging from the tree, the candy cane conjures up Christmas magic and sends the tingling cool of the beloved peppermint taste and smell through our senses.
We’d like to share with you a recipe we came across from a classic holiday collection just one of many stunning Christmas cookies from the modern era, inspired by classic Christmas images.
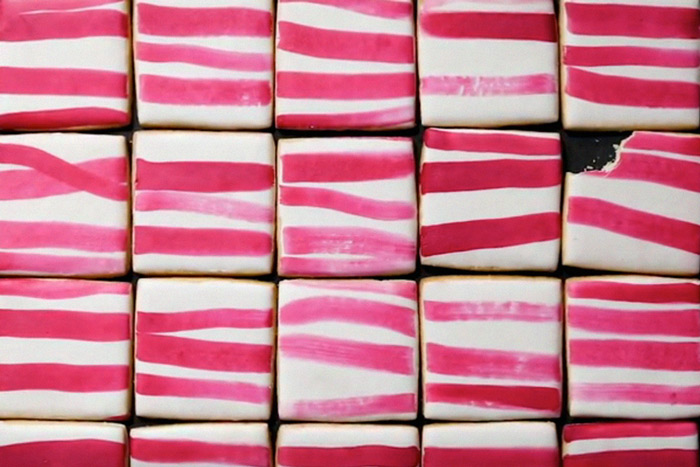
The beautiful design of these Peppermint Stripe Cookies will enchant everyone at your holiday gathering, whether young or old.
INGREDIENTS
FOR THE ROYAL ICING:
2 cups/245 grams unsifted confectioners’ sugar, plus more if needed
2 egg whites (or 2 tablespoons meringue powder and 4 tablespoons water)
A few drops of glycerin, if desired to create more of a sheen (optional)
FOR THE COOKIES AND
DECORATING:
Use you favorite recipe for Basic Sugar Cookies, and flavor the dough flavored with 1/2 teaspoon peppermint extract (omitting vanilla extract from your recipe), cut into 3-inch squares and cooled
Red and pink petal dust and luster dust
PREPARATION
Royal icing: use whip attachment in stand mixer combine the confectioners’ sugar, egg whites and glycerin. Combine on low speed, and raise speed to high until stiff peaks form. Test icing on a cookie: If it doesn’t spread out to a smooth finish within 10 seconds, it’s too thick. Add as needed, 1 to 2 tbsp water as needed to thin the mixture, whipping it by hand using attachment. If icing slides off edge of cookie, it’s too thin. Add more sugar to thicken. Yield should be 1 1/2 cups of icing.
Transfer to a airtight container and refrigerate. (The icing will keep, refrigerated, for several weeks.)
Decorate the cookies: Pour the royal icing into a wide bowl. Do not use cold as it may separate. If there is separation simply whip together. Hold the cookie by the edges, with the top-side down and dip into the icing. Move the cookie back and forth to coat the whole surface. Gently shake from side to side to excess icing drip off.
Use small offset spatula to stop the flow of icing, gently scrape cookie against edge of bowl, and flip the cookie over. Use the spatula to spread icing and popping air bubbles. Make sure it icing goes all the way to the edges. It should quickly smooth out on its own. If not, thin it out a bit until it does. Use your fingers to wipe away any icing on the outside edges. Repeat with all the cookies. Place on a cooling rack set over a parchment- or wax paper-lined baking sheet to dry completely, preferably overnight (or at least 4 hours).
When dry, set up the cookies on a baking sheet or other flat surface in four rows of five cookies (you may have a few extra cookies), so they are next to one another with no space. Mix the petal dust and luster dust with enough peppermint extract to make a very loose “wash” and, using brushes of different widths, make continuous brushstrokes in a few different widths across the entire surface. If you run out of pigment as you’re brushing, dip the brush again, and continue the line, allowing the brush texture to show in places. When dry, rearrange the cookies on a platter so the lines no longer match up. Cookies will keep in an airtight container for up to 2 weeks.